
VanityFilter 2.0 looks nothing like the version before it, and that is on purpose. The old app was one tall column of sliders next to a boxed preview. 2.0 opens the whole window up to your footage and tucks the controls into clean floating panels you summon only when you need them. Here is the full tour, including where every setting from the old layout now lives, so nothing feels lost. Drag the slider below to see both the new interface and the smoothing it delivers.
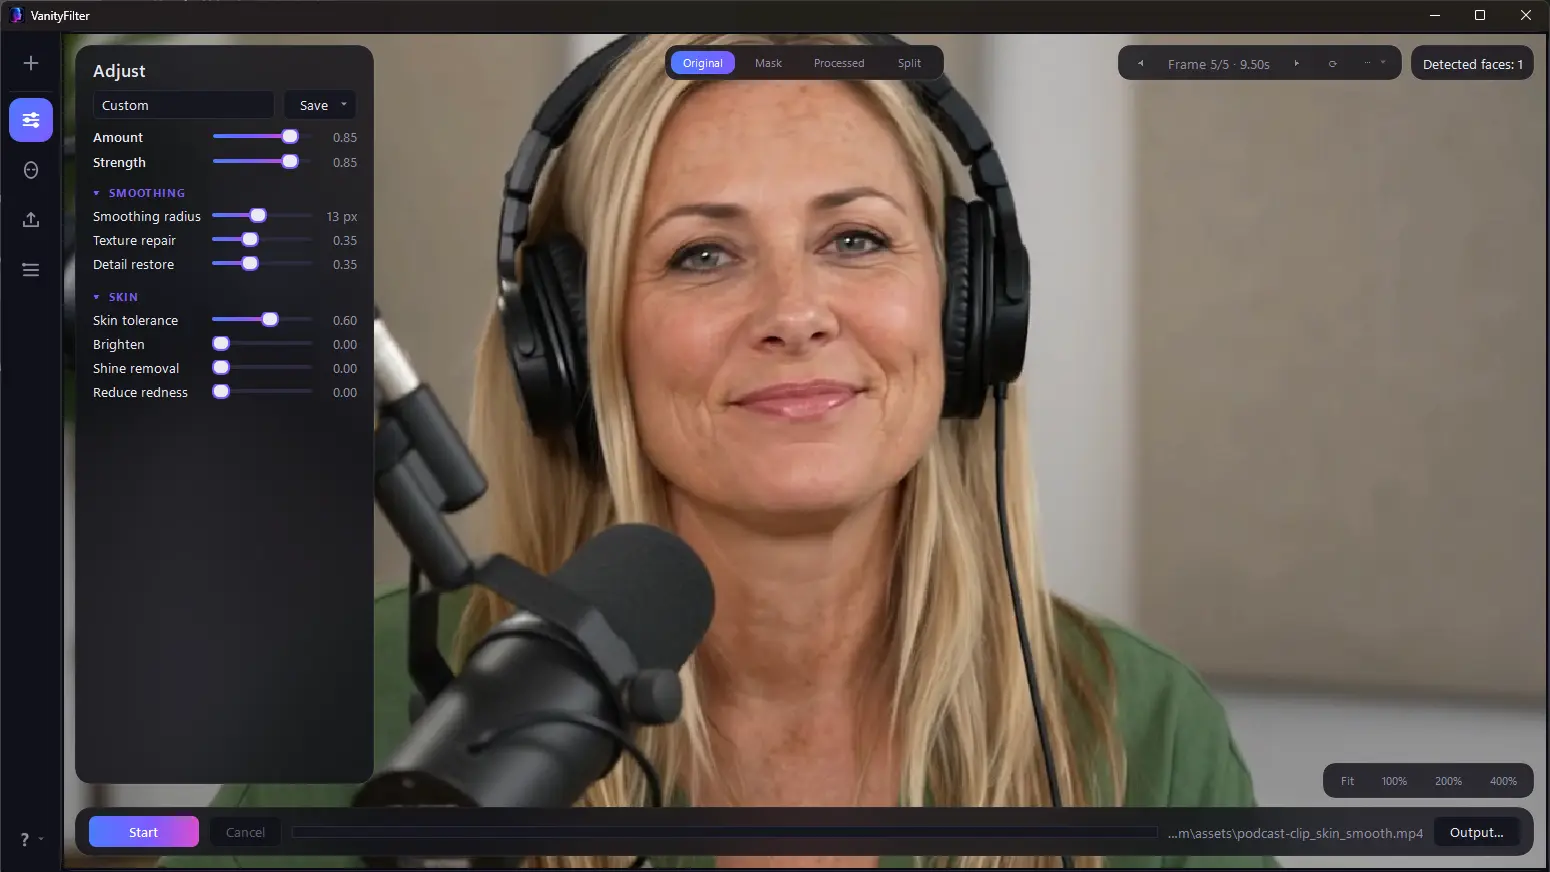
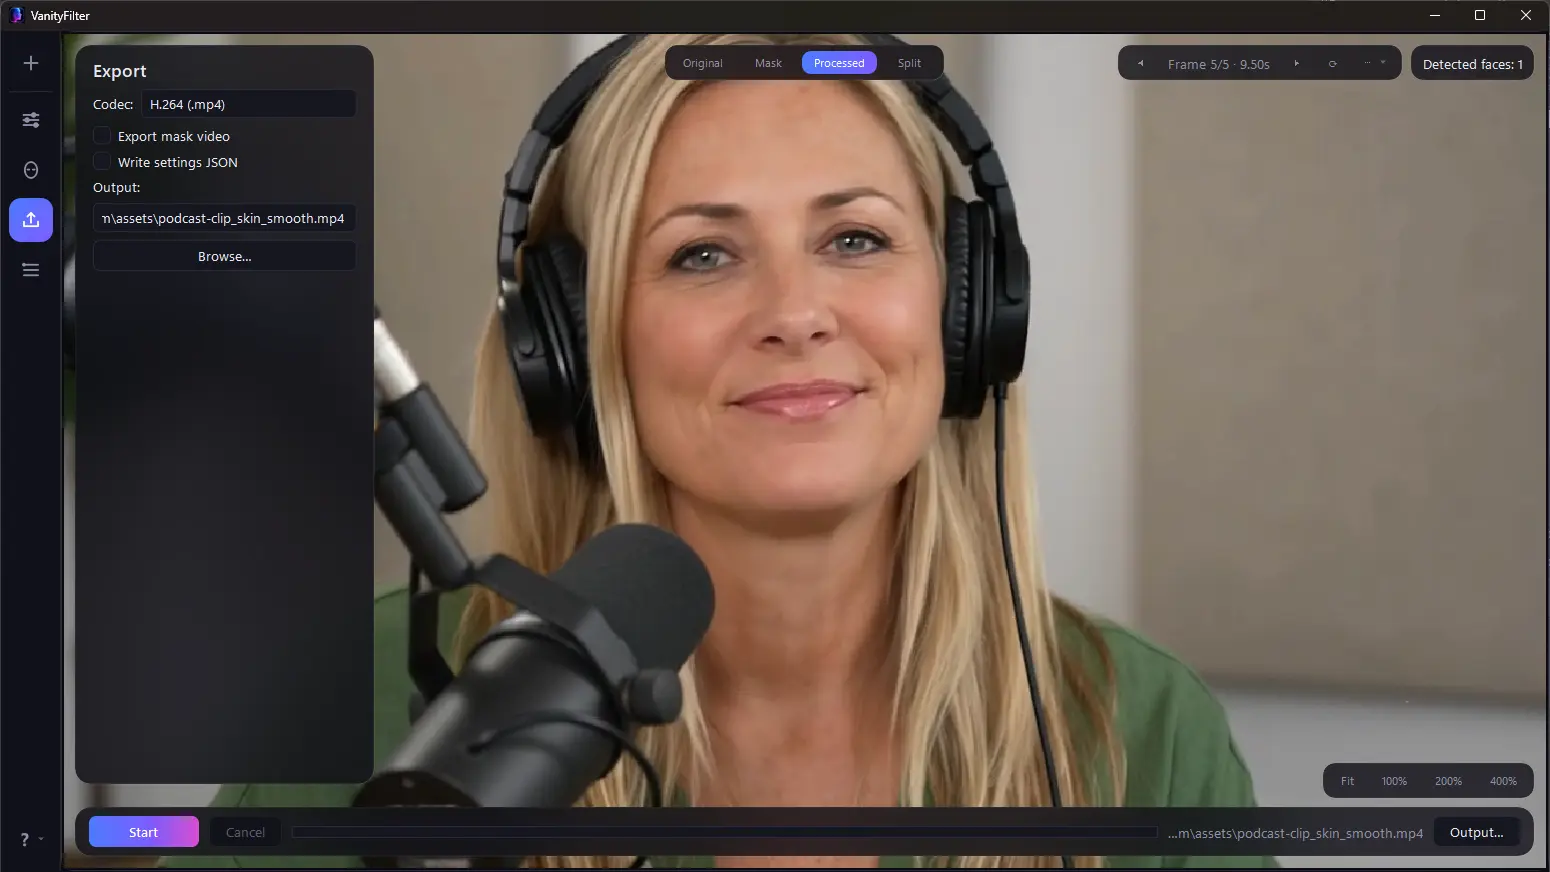
The 2.0 interface on a real podcast clip. Drag to see the smoothing, and notice the full-frame preview, the floating panel on the left, and the view chips across the top.
The short version: VanityFilter 2.0 keeps every control you already know and moves them into clean floating panels over a full-screen preview. The look sliders live in Adjust, the mask sliders in Mask shape, and your files in Queue. Nothing was removed, a few things were added, and your presets and results are exactly the same.
The new layout, at a glance
The old app was a single tall stack of sliders sitting beside a boxed preview. 2.0 gives your footage the whole window and hides the controls in panels you call up when you want them. Here is the whole thing in five pieces:
- The icon rail runs down the left edge: a plus to open a video, then Adjust, Mask shape, Export, and Queue, with a ? at the bottom for help, updates, and About.
- The preview fills the rest of the window. Zoom and pan work exactly as before, and a double-click still fits the frame.
- Floating chips sit over the preview for the things you glance at constantly: view mode, frame navigation, face count, and zoom.
- The transport bar along the bottom holds Start, Cancel, the progress bar, and your output path.
- Floating panels replace the old two-column slider grid. Click a rail icon to open its panel over the preview, then click the same icon again to hide it for a clean, full-frame view.
A tour of the panels
Four panels, each with one job. Open one from the rail and it slides in over the left side of the preview.
Adjust: the look
This is where you shape the skin. Presets and Save sit at the top, then the master Amount slider and Strength. Below that, two collapsible groups keep things tidy: Smoothing (smoothing radius, texture repair, detail restore) and Skin (skin tolerance, Brighten, Shine removal, Reduce redness). Collapse a group you are not using and it gets out of your way.
Mask shape: where the effect lands
Everything that controls the mask itself lives here: face expansion, forehead and neck coverage, feathering, and mask stability, plus the Show regions toggle for seeing exactly where the mask sits. In the old layout these were a second slider column that was always on screen. Now they open only when you are dialing in the mask.
Export: how it comes out
Codec (H.264 or ProRes), Export mask video, Write settings JSON, and your output path with a Browse button. You can also jump straight to the output path from the Output button on the transport bar.
Queue: your files
Your loaded video, its details (resolution, frame rate, duration, audio), and, for batch jobs, the full file list with per-file status. Drop in one clip or a whole folder and watch them tick through here.
The chips over the preview
Four small controls float over the image so the things you check most are always a glance away, never buried in a menu.
- View chip (top center): Original, Mask, Processed, and Split. Split is the side-by-side wipe for judging your result against the original.
- Frame chip: previous and next arrows, a "Frame N of M" readout, and two small buttons. The ↻ regenerates your preview frames, and the ⋯ menu holds the frame count, the random toggle, and add-a-frame-at-a-timecode.
- Faces chip (top right): the live count of detected faces, so you know at a glance that everyone in the shot is covered.
- Zoom chip (bottom right): Fit, 100, 200, and 400 percent. Reset is folded into Fit, and double-clicking the preview fits it too.
Coming from the old version? Here is where everything moved
If you are updating from 1.x, the single most useful thing to know is that nothing was removed. Every control still exists, it just has a new home. The quick map:
- Open Video is now the plus at the top of the rail; your file details and batch list live in Queue.
- The look sliders (strength, smoothing radius, texture repair, detail restore, skin tolerance, brighten) are all in the Adjust panel, in the Smoothing and Skin groups.
- The mask sliders (face expansion, forehead and neck coverage, feathering, mask stability, show regions) moved to Mask shape.
- Generate Previews is the ↻ on the frame chip; the count, random, and at-time options are in its ⋯ menu.
- The View dropdown became the segmented view chip, and Side by side is now called Split.
- Start, Cancel, and progress live on the transport bar along the bottom.
That is the whole migration. Once you can find the Adjust and Mask shape panels, you already know where everything is.
New in 2.0
A few controls have no old-version equivalent, so they are genuinely new rather than moved:
- Amount, a master wet/dry slider at the very top of Adjust that scales the entire effect at once. Dial in a look, then ease the whole thing back with one slider.
- Shine removal and Reduce redness, two new sliders in the Skin group for taming specular hot spots and evening out blotches or flush.
- Automatic updates: a banner when a new version is out, plus Check for Updates, an auto-check toggle, and About under the ? on the rail.
- Window memory: the app opens at a sensible size and remembers where you left it.
For the full release rundown, see the changelog.
What stayed exactly the same
This is a layout change, not a new engine. The processing, your presets (including the saved User 1 and User 2 slots), the export formats, and the command-line tool are all identical. A preset that gave you a certain look in the old version gives you the same look in 2.0, pixel for pixel. If you already know how to smooth skin in video without it looking fake, none of that changes. You just have a cleaner room to do it in.
FAQ
Did any features get removed in the VanityFilter 2.0 redesign?
No. Every control from the old layout still exists in 2.0. The redesign moved controls into floating panels and
added a few new ones, but nothing was taken away. Processing, presets, and the command-line tool are unchanged.
Where did my sliders go in VanityFilter 2.0?
The look sliders live in the Adjust panel, split into Smoothing and Skin groups. The mask sliders moved to the
Mask shape panel. Open either one from the icon rail on the left side of the window.
Do my saved presets still work after updating to 2.0?
Yes. Your presets, including the saved User 1 and User 2 slots, carry over unchanged. The underlying processing
and the command-line workflow are identical, so a preset produces the same result it always did.
How do I compare before and after in VanityFilter 2.0?
Use the view chip at the top of the preview. It has Original, Mask, Processed, and Split. Split is a side-by-side
wipe of the original and the smoothed result. It was called Side by side in the previous version.
Is the VanityFilter 2.0 interface harder to use?
It is built to be simpler. Panels open only when you need them, so most of the time you see a large, clean
preview. The sliders group into collapsible sections, so only the controls you are using stay on screen.
Ready to try it? Download VanityFilter and open a clip to see the new interface for yourself.