Premiere Pro can absolutely smooth skin, but there is no magic “retouch face” button hiding in the effects panel. You either build the look yourself with a blur and a tracked mask, buy a plugin, or smooth the footage before it ever hits your timeline. Here are all three, straight up, plus when each one actually makes sense. Drag the slider below: that’s the real VanityFilter window, same clip, flipping between the original and the processed frame with the exact settings sitting right there in the panel.
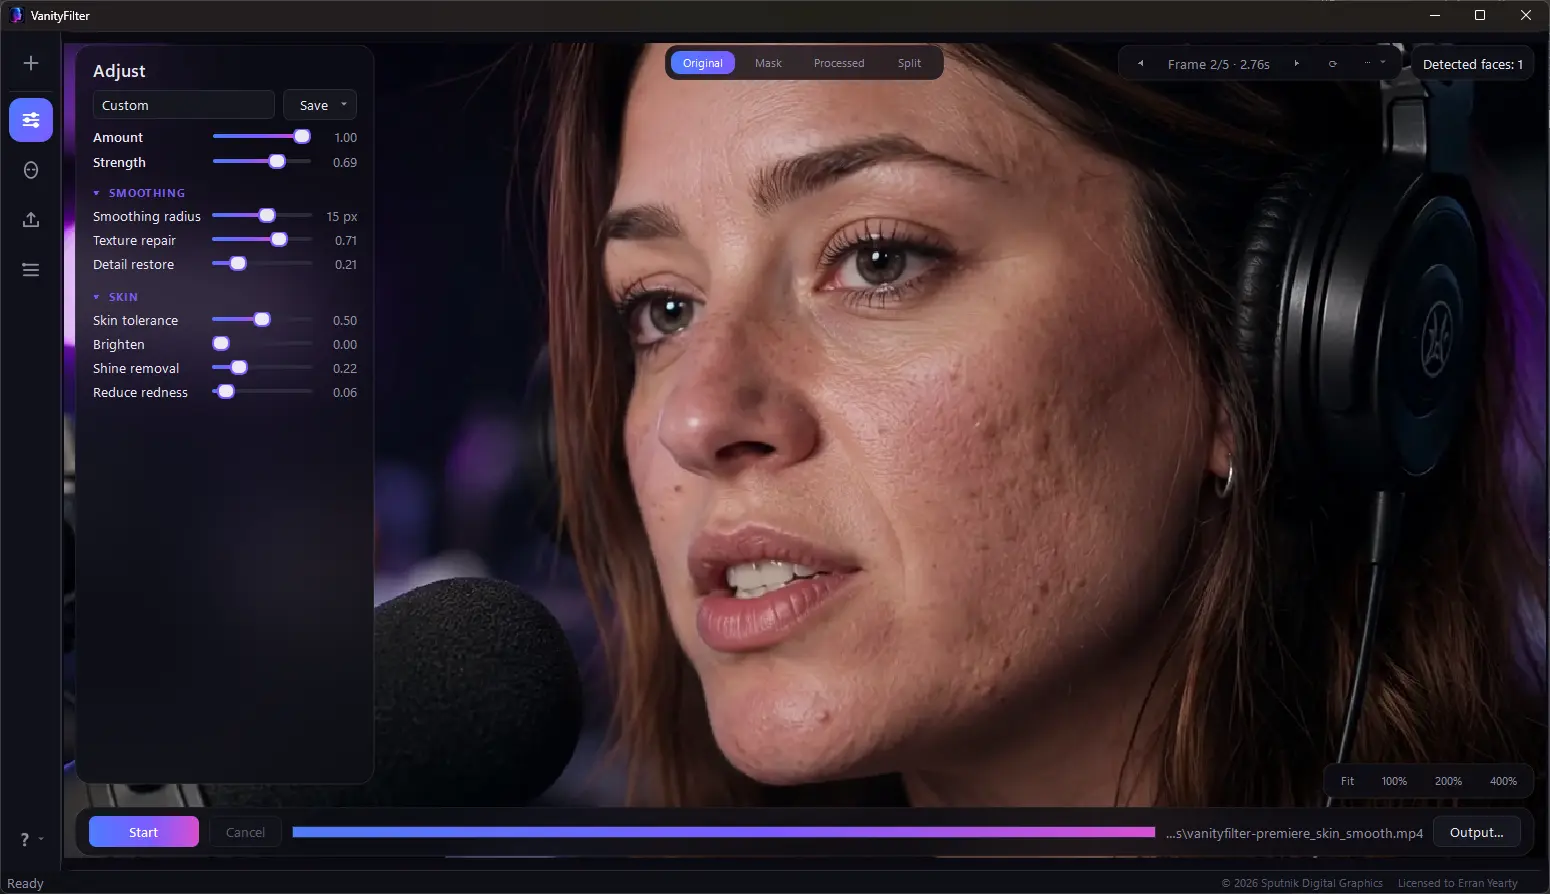
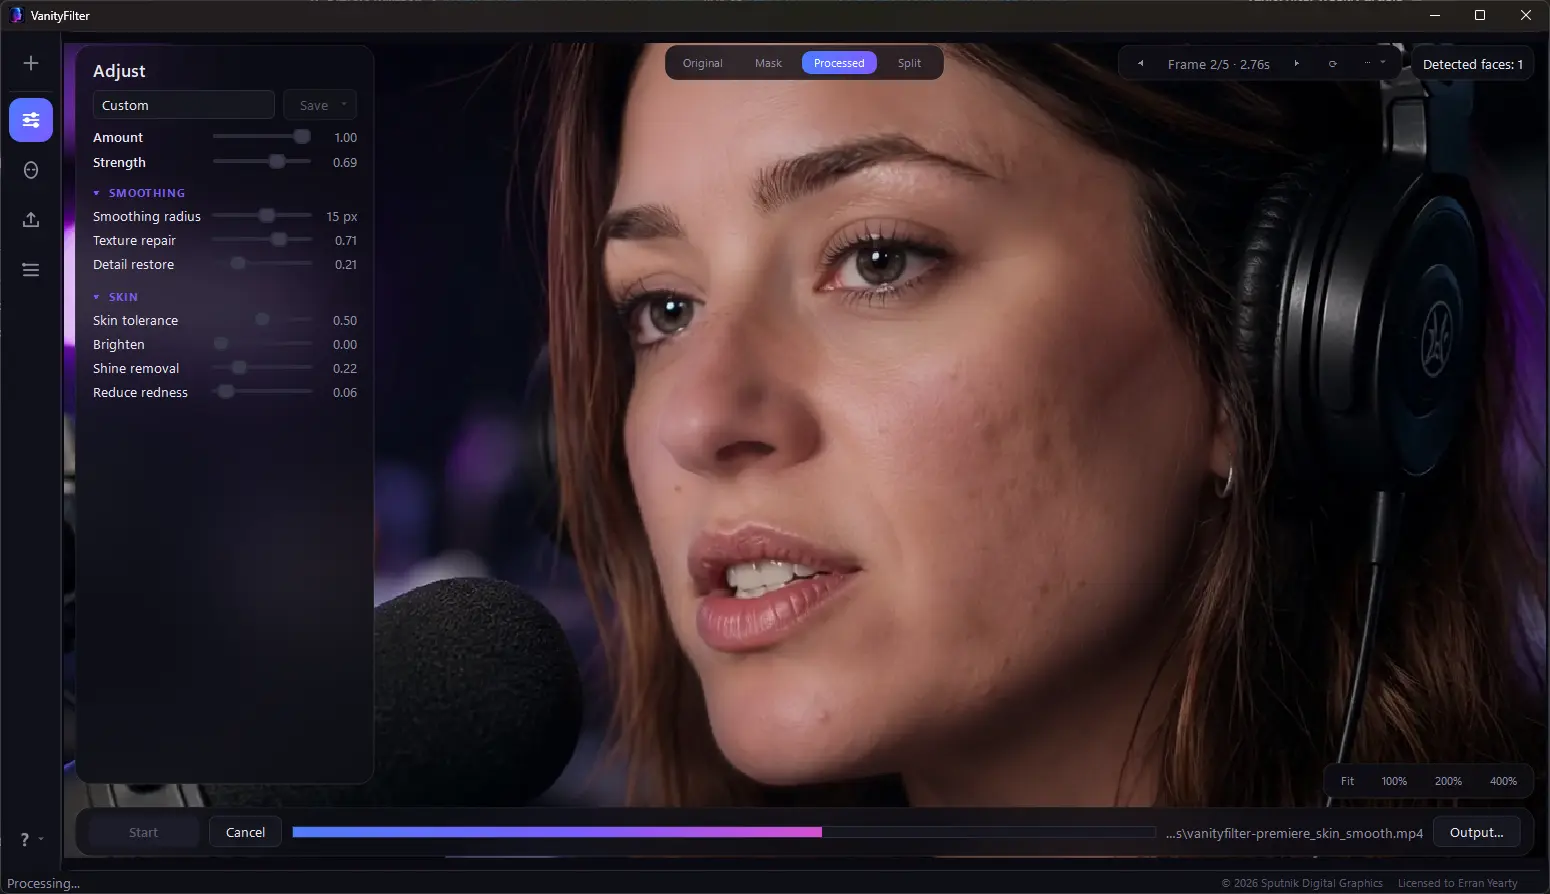
The actual VanityFilter window. Toggle between the Original and Processed tabs and only the skin changes: eyes, brows, lips, hair, and the mic all stay sharp.
The short version: Premiere has no dedicated skin smoother, so the built-in route is a duplicate clip plus Gaussian Blur plus a tracked mask. It looks good but it’s manual and slow per shot. A plugin like Beauty Box automates it but adds a subscription and renders on your timeline. If you want the fastest path, smooth the footage before you edit with a dedicated app so Premiere just sees clean, finished clips.
Method 1: The built-in way (no plugins)
This is the classic no-plugins technique every Premiere tutorial teaches. You’re basically painting a soft blur onto the skin only, then dialing it back so it doesn’t go full wax figure. Here’s the flow:
- Duplicate the clip. Hold Alt (Option on Mac) and drag the clip straight up onto the video track above, so you have two identical copies stacked.
- Blur the top copy. Drop a Gaussian Blur onto the upper clip, turn on Repeat Edge Pixels, and push Blurriness up until the skin goes smooth (it’ll look way too much at this point, that’s fine).
- Mask the skin. In Effect Controls, use the Gaussian Blur’s pen or ellipse mask to draw around the cheeks, forehead, and neck. Crank Mask Feather high so the edges melt in, and avoid the eyes, lips, and hairline.
- Track it. Hit Track Selected Mask Forward so the mask follows the face as the person moves. Keep an eye on it, trackers drift when the head turns.
- Bring texture back. Lower the top clip’s Opacity to roughly 40 to 60 percent so real pores and detail show through. If you skip this step, you get plastic skin, and everyone can tell.
It works and it’s free. The catch is that it’s all manual: one face, one mask, one track, per shot. Got three talking-head angles and a two-person interview? That’s a lot of masking. And when someone turns to profile, the tracker often loses them. If your whole aim is a natural finish, our guide on how to smooth skin in video without looking fake breaks down why under-doing it and protecting texture matters so much.
Method 2: A skin-smoothing plugin (Beauty Box)
If you live in Premiere and want to automate the masking, a plugin is the obvious move. Digital Anarchy Beauty Box is the go-to: it auto-detects skin, smooths with frequency separation (so texture survives), and gives you sliders instead of hand-drawn masks. The output is genuinely nice.
Two honest trade-offs. First, it’s a paid subscription plugin on top of your Creative Cloud bill. Second, it renders per clip on your timeline, so a long edit stacked with beauty effects on every face shot can bog down playback and slow your export. For a single hero shot it’s great. For a backlog of episodes, it adds up.
Method 3: Smooth it before Premiere ever sees it
Here’s the route a lot of creators land on once the per-clip effects start dragging: retouch the footage first, then edit clean plates. VanityFilter is a standalone Windows app that does exactly this. Open a clip (or a whole folder) and it automatically finds every face in the frame, up to five, including profiles, builds a per-person skin mask, and smooths only the skin. Eyes, lips, hair, hats, glasses, and the background stay exactly as shot. No masking, no tracking, no keyframes. That’s the exact window up in the slider, and it’s the clip playing in the demo video.
The exact settings in that shot
- Amount1.00
- Strength0.69
- Smoothing radius15 px
- Texture repair0.71
- Detail restore0.21
- Skin tolerance0.50
- Brighten0.00
- Shine removal0.22
- Reduce redness0.06
Nothing exotic there: a moderate Strength, high Texture repair to clear the blotches, a touch of Detail restore so pores survive, plus light Shine removal and Reduce redness. You export a finished ProRes or H.264 file and drop it into Premiere like any other clip. Because the retouch is baked into the source, there’s zero beauty effect on your timeline, so playback stays snappy and exports don’t crawl. This is the core idea behind our smooth skin before you edit workflow, and it scales way better when you’re processing a batch of clips instead of babysitting masks shot by shot.
Side by side
| Built-in blur + mask | Beauty Box plugin | VanityFilter (pre-edit) | |
|---|---|---|---|
| Cost | Free (in Premiere) | Paid subscription | $49 one-time, currently $29.95 |
| Setup per shot | Mask + track by hand | Auto, on each clip | Auto, before editing |
| Multiple faces | One mask each | Handled | Up to 5 automatically |
| Profile / turned heads | Tracker can lose them | Usually holds | Dedicated fallback detector |
| Timeline load | Blur renders per clip | Effect renders per clip | None (clips are already clean) |
| Best for | One quick hero shot | In-Premiere automation | Batches, multi-person, fast edits |
You can also use them together
These aren’t either/or. VanityFilter can export a grayscale mask matte plus a settings sidecar. Bring that matte into Premiere as a track matte and you can composite or grade the smoothed skin with full control, letting the app do the hard per-person masking while you finish inside your NLE. If you also cut in Resolve, the same trick works there, which we cover in our DaVinci Resolve vs. VanityFilter comparison.
See it on real footage
Here’s the same clip from the slider up top, playing start to finish. The skin gets smoothed while the eyes, lips, hair, mic, and background all stay exactly as shot. This is a straight VanityFilter export, no Premiere effect on top.
FAQ
Does Premiere Pro have a built-in skin smoothing tool?
Not a one-click one. You smooth skin by duplicating the clip, adding a Gaussian Blur to the top copy, then drawing and
tracking a feathered mask over the skin and lowering opacity so texture returns. It works, but it’s manual and
tracked shot by shot.
How do I smooth skin in Premiere Pro without plugins?
Alt-drag the clip to the track above, apply Gaussian Blur with Repeat Edge Pixels on, draw a soft feathered mask over
the skin, click Track Selected Mask Forward, then drop the top clip’s opacity to about 40 to 60 percent so pores
and detail come back.
What is the best skin smoothing plugin for Premiere Pro?
Digital Anarchy Beauty Box is the best known option. It auto-detects and smooths skin with frequency separation, but
it’s a paid subscription and it renders per clip on your timeline.
Can I smooth skin before importing into Premiere Pro?
Yes. VanityFilter smooths the raw clip first and exports a clean ProRes or H.264 file you edit normally, so no beauty
effect slows your Premiere timeline. It can also export a mask matte to use as a track matte inside Premiere.
Related: How to smooth skin in video without looking fake · Get VanityFilter