
Face detection does not know which face you care about. In this interview it finds five: the guest and four photographs. The film shows how VanityFilter 3.1 keeps the portraits out of the treatment, and this page walks through it chapter by chapter. Click any timestamp to jump the player there. The rest of what is new in 3.1 follows below.
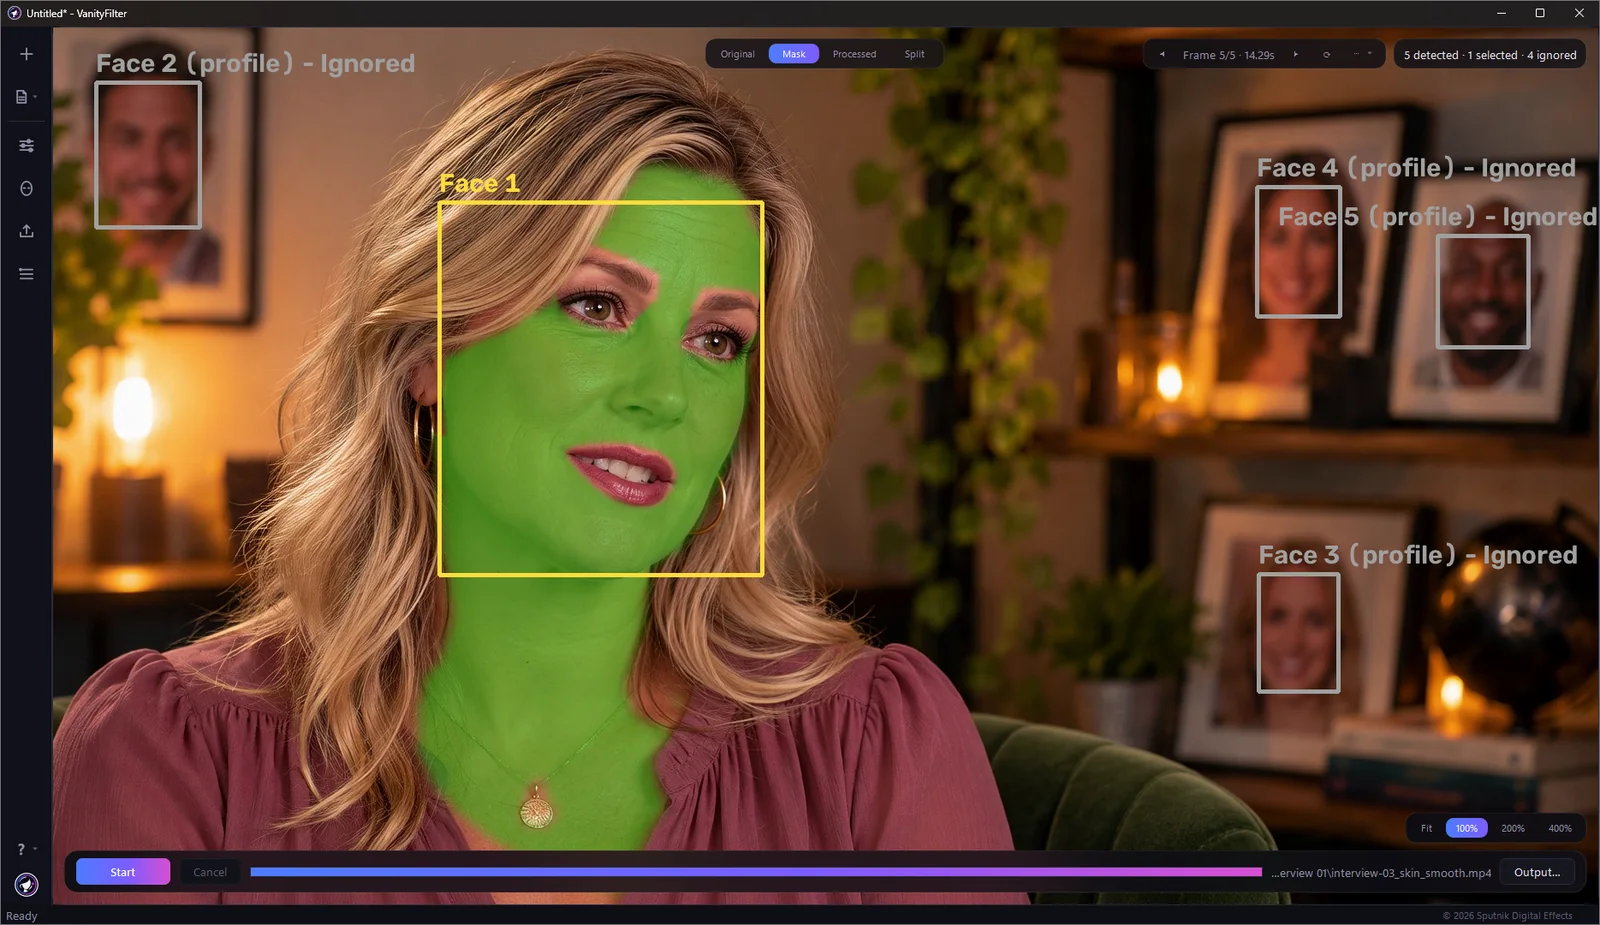
The short version: switch the preview to Mask, read the face counter, then raise Ignore small faces until the background portraits turn gray (22.5% here). With one person in frame, Primary face only does it in one click. Check the sample frames before you export.
0:00 Five faces in one interview shot
The shot looks simple: one guest, good light. Behind her, four framed portraits sit on a shelf, and face detection counts every one of them. Skin smoothing cannot tell your subject from a printed face, so the first job is telling it which face matters.
0:13 Switch the preview to Mask
In Mask view, VanityFilter outlines and numbers every face it finds. Five are detected. One is the guest; the other four are photographs, and out of the box all five are selected for treatment. The counter in the top corner reports detected, selected and ignored faces separately, so you can see the problem before you render anything.
0:27 What happens at zero
With Ignore small faces at 0, the picture frames light up green: five selected, none ignored. That is treatment spent on printed faces nobody asked you to retouch, and in a moving shot it can make the background look subtly wrong.
0:40 Ignore small faces
Ignore small faces skips any face shorter than a set share of the frame height. At 22.5% the portraits drop out and the counter reads 5 detected, 1 selected, 4 ignored. Ignored faces keep a gray box and an Ignored label, so you can still see what was detected without mistaking it for a treatment target.
0:58 Primary face only and the Adjust settings
With a single subject in frame, Primary face only does the same job in one click. Then comes the ordinary retouch, set in the Adjust panel:
The settings in this walkthrough
- Ignore small faces 22.5%
- Strength 0.78
- Smoothing Radius 12 px, Texture Repair 0.30, Detail Restore 0.50
These suit this clip, not every interview. Use them as a starting point.
1:16 Check the frames, then export
Step through the sample frames before you commit. Her skin is in the mask; the shelf never is. Then export. VanityFilter writes a new file and leaves the original alone.
1:28 Before and after
Same room, same prints on the shelf, softer skin on the one face that asked for it. For more on separating people in a shot, read smoothing skin in podcast video.
Everything else new in VanityFilter 3.1
A good skin treatment depends on its boundaries. You may want to soften the skin just above a lip without touching the lip itself, or treat a forehead without smoothing eyebrow hair. Those decisions change with the person and the shot. VanityFilter 3.1 adds controls for those edges, along with project files that let you return to a session without rebuilding your settings.
The release is available now as 3.1.5. Here is what changed and where the new options help.
Save a project, not only a preset
A preset stores a treatment you want to reuse. A project remembers the session you were working on. New .vain project files restore your loaded clips, treatment settings, trim, export options and preview position. You can save a test, close the app and come back to the same setup later.
Use the Project menu for New, Open, Save or Save As. The shortcuts are Ctrl+N, Ctrl+O, Ctrl+S and Ctrl+Shift+S. An asterisk in the title marks unsaved changes, and the app asks before discarding them. Close Project, also available with Ctrl+W, clears the current session without quitting VanityFilter.
Projects link to the source videos; they do not embed or duplicate them. Keep those videos with your work. If a linked file has moved, VanityFilter asks you to locate it when you open the project. The Windows installer also associates .vain files with the app, so you can open one from File Explorer with a double-click. If the app is already running, that opens another instance.
Adjust protection around lips and eyebrows
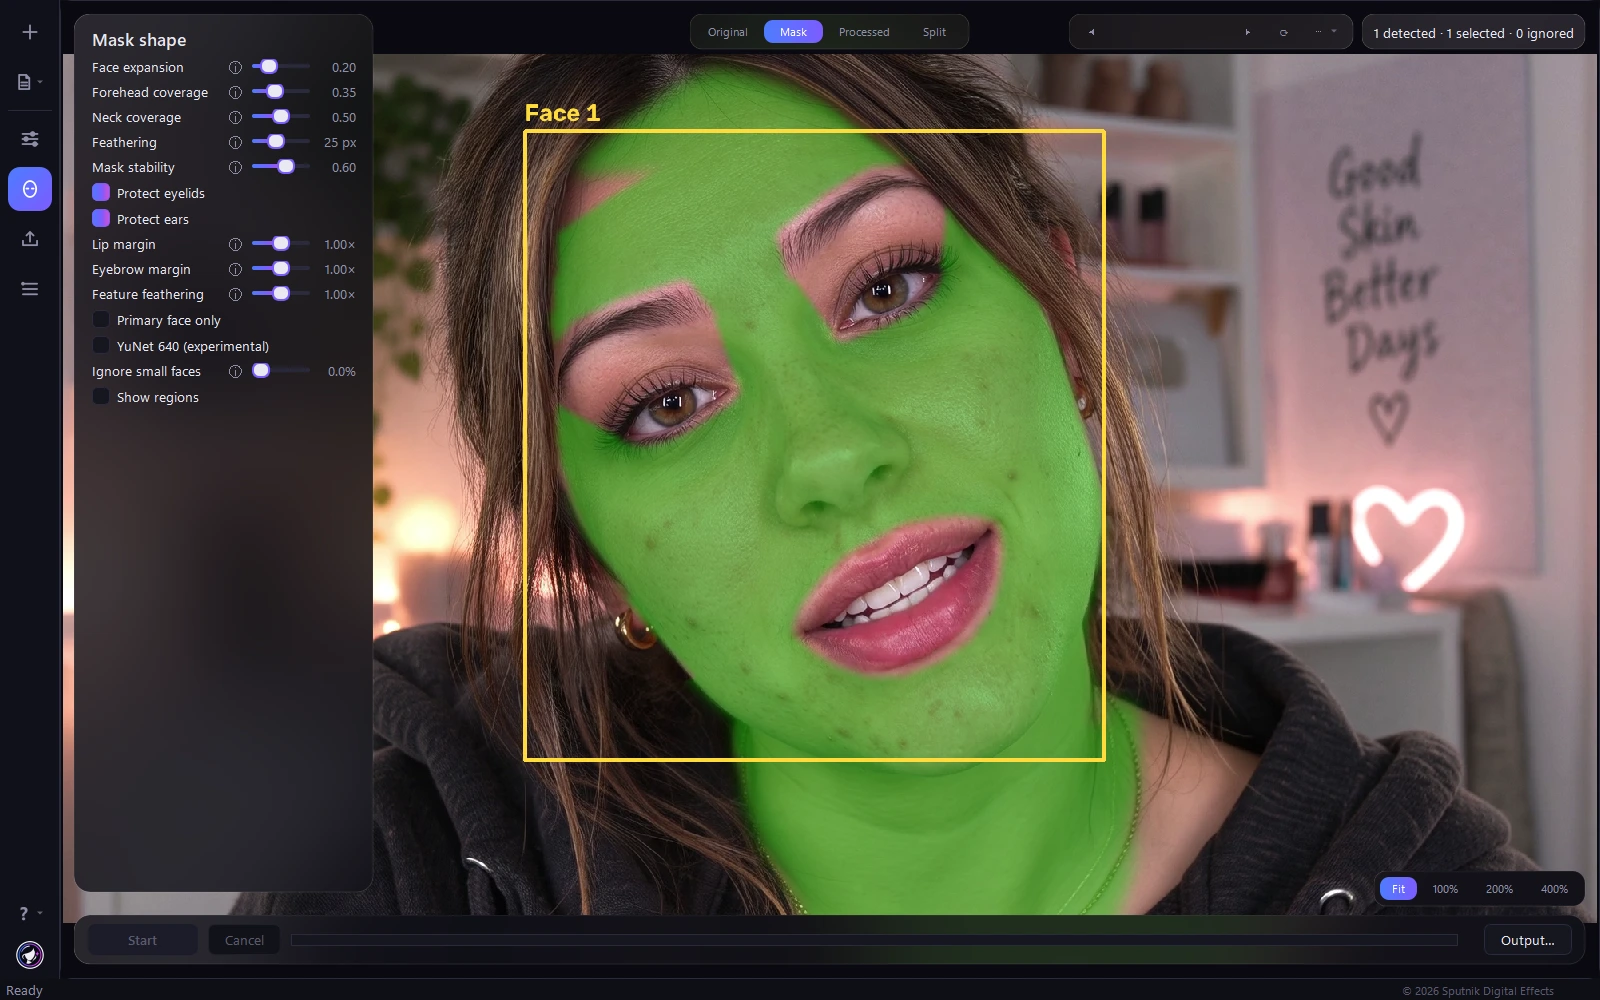
The Mask shape panel now includes Lip margin and Eyebrow margin. These adjust the amount of surrounding skin protected alongside each feature. A smaller margin brings treatment closer to the edge; a larger one leaves a wider protected area. The lips, mouth and eyebrow hair remain protected at every setting.
This is useful when the default boundary leaves too much skin untreated around the mouth, including fine lines above the upper lip. Start with the mask view, reduce the lip margin a little, then compare the processed result. The aim is to reach the skin you want to treat without softening the lip's shape.
Feature feathering controls the transition around protected lips and eyebrows. It is separate from the outer Feathering control, so changing that local transition does not require changing the whole face mask. Protection is also reapplied after temporal mask blending, preventing an earlier mouth position from filling a protected area back in.
Better cheek coverage when a head turns
The ear-protection region now follows head turns more closely. Previously, the far-side ear guard could sit on the visible cheek and leave a wedge of skin untreated. The revised geometry moves that guard outward as the head turns.
There is also a Protect ears toggle, enabled by default. If the inferred guard still cuts into the cheek in a particular shot, you can switch it off for that clip and inspect the difference. This does not turn off the other feature protections.
See which detected faces are actually selected
A detected face is not necessarily a face being treated. Ignored detections now have gray boxes and an Ignored label, while the preview reports separate detected, selected and ignored counts. A small background detection can remain visible for inspection without looking like an active treatment target.
Ignore small faces now displays its threshold as a percentage of the frame height. That makes the measurement explicit instead of showing an unexplained decimal. Use the mask overlay to confirm the selection, especially in interviews with background photographs or other objects that can trigger a detection.
Export improvements, plus an optional detector experiment
Export now overlaps more processing work. The mask and finishing stages run on separate threads, and skin segmentation can prepare the next frame while other work continues. Frames are still written in order. The improvement depends on your hardware, footage and enabled effects; it is not a promise that every export will be twice as fast.
The separate YuNet 640 (experimental) option reduces the fallback detector's input width from 960 pixels to 640. It is off by default. It does not lower the resolution of your exported video or change the main face landmarker. It can change which faces are detected, and export tests produced mixed speed results. Try it on a representative section and compare both detection and render time before using it for a full job.
Get the release
Download VanityFilter 3.1.5 for Windows. For the detailed change list, including the earlier 3.0 blemish and redness improvements, visit the changelog. As with any treatment change, check a rendered section in motion before exporting your final delivery.
Great light, great guest, and four extra faces on the shelf behind her. Skin smoothing cannot tell your interview subject from the portraits in the background. So the first job is teaching it the difference. Switch the preview mode to Mask. VanityFilter outlines every face it finds. Five detected. One is your speaker. The other four are photographs. And out of the box, they are all selected for treatment. Drop Ignore Small Faces to zero and watch the picture frames light up green. Five selected, none ignored. That is smoothing being spent on printed faces that nobody asked you to retouch. So drag Ignore Small Faces up. It skips any face shorter than that share of the frame height. At 22.5%, the portraits fall away and the counter says it plainly. 5 detected, 1 selected, 4 ignored. One subject in frame? Primary Face Only does the same job in one click. Then the ordinary retouching. Strength at 0.78, Smoothing Radius 12 pixels, Texture Repair 0.3, Detail Restore 0.5. Step through the sample frames before you commit. Her skin is masked. The shelf never is. Then export. And the only face that changed is the one sitting in the chair. Before. After. Same room, same prints on the shelf, softer skin on the one face that asked for it. VanityFilter 3.1. Retouch every face. Touch nothing else.