
The export on your computer looks fine. You upload it, wait ten minutes, hit play, and the face has turned into wet clay. Fine texture is gone. The cheeks pulse when the subject moves. A soft highlight that looked natural in the master now breaks into a flat patch. Before you rebuild the edit, figure out which of two things failed: the skin pass or the version YouTube is currently showing you.


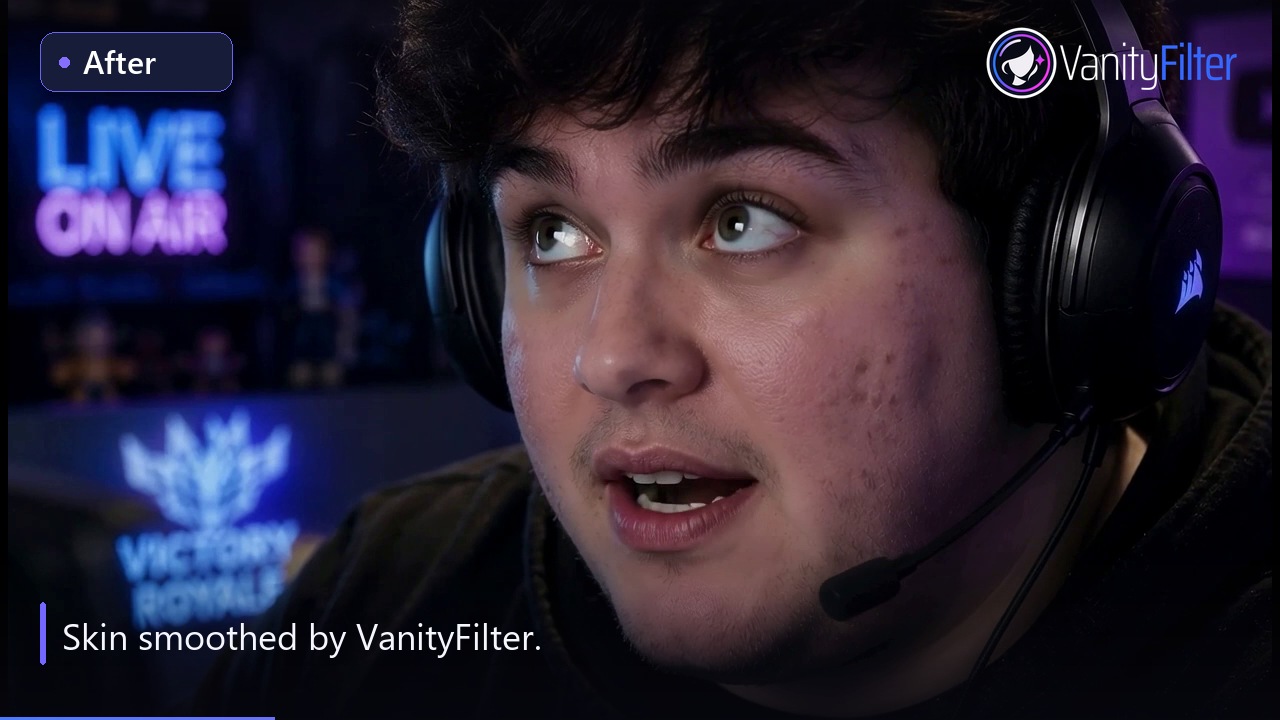
This is a real VanityFilter result, not a simulated YouTube encode. The point is the starting master: skin is softer, but the face still contains texture and the surrounding detail stays crisp.
The short version: wait for the full-resolution playback version, compare movement rather than a paused frame, and upload a clean master at the native frame rate. If the final encode still looks waxy, the skin pass was probably too flat before YouTube touched it. In my editing tests, compression tends to expose that mistake rather than create it from nothing.
First, make sure you are judging the finished version
YouTube publishes a low-quality version first. Higher-resolution versions keep processing in the background. According to YouTube’s current low video quality after upload page, 1080p and 4K can remain unavailable for hours, depending on the video’s length, format, frame rate, and current traffic.
That means a 360p or 480p first look tells you almost nothing about the finished picture. Open the player’s Quality menu. If the resolution you delivered is missing, stop grading your grade. The platform is not done.
The sensible publishing route is an unlisted upload. Let every intended quality finish processing, watch the hard parts, then make the video public. YouTube itself recommends this approach when creators want all qualities ready at launch.
The failure usually appears in motion
A paused face can hide a bad skin pass. Motion cannot. Watch a head turn, a laugh, or the moment a cheek crosses a key light. Those are the frames where flat areas begin to crawl and a mask edge can announce itself.
Here is the editorial diagnosis I use. It is a practical test, not a claim about the exact codec YouTube assigned to a particular viewer.
| What you see | Likely cause | What to check next |
|---|---|---|
| The whole frame is soft | The high-resolution version is unfinished, or playback quality fell | Open Quality and select the delivered resolution |
| Only skin looks flat | The smoothing pass removed too much texture before export | Compare the local master with the upload at the same timestamp |
| Cheeks pulse during movement | The correction or mask is changing frame to frame | Inspect the processed master before blaming the upload |
| Hair and eyelashes look crunchy | Global sharpening was used to compensate for soft skin | Remove the global sharpen and repair the skin pass itself |
| Color bands appear in warm skin | The grade may be too aggressive for the delivery encode | Back off the local chroma correction and export a fresh test |
Before and after, in motion.
Compare the same recorded clip before and after processing, with synchronized switches.
Why a strong retouch loses twice
Skin is difficult video content. It contains slow color gradients, small texture, specular highlights, and constant subtle motion. Heavy smoothing removes the small differences first. What remains is a broad, low-contrast patch with hard detail around it: eyes, brows, lips, hair.
Then YouTube creates playback versions from that master. The platform’s recommended upload settings specify 4:2:0 chroma subsampling for H.264. In plain English, color is stored at lower spatial detail than brightness. That is normal delivery video, but it is one more reason not to build a skin correction out of delicate color transitions that only survive in your high-bitrate editing file.
The right goal is not perfectly uniform skin. It is a stable face with enough real variation to survive another encode. Our guide to smoothing skin without looking fake covers the retouching side of that line.
Do one retouch pass, then protect the master
Repeated lossy exports are an own goal. If you smooth an already compressed edit, export it, import that file into another timeline, and export again, you have created several chances to damage the same gradients.
Process from the best source you have. Keep the retouched file as a clean intermediate or take it straight into the edit. Then make one delivery export. This is also why the pre-edit skin-smoothing workflow is useful for long videos: the correction happens once on the source, not again on every cut and revision.
Use YouTube’s settings as a floor, not a superstition
For ordinary SDR uploads, YouTube currently recommends MP4, H.264 High Profile, progressive scan, variable bitrate, and the same frame rate used during recording. Its reference ranges are 8 Mbps for 1080p at 24 to 30 fps and 35 to 45 Mbps for 2160p at those frame rates. It recommends BT.709 for SDR.
Those numbers do not guarantee beautiful skin. They remove avoidable mistakes. A clean 4K source should usually stay 4K through the export. A soft 1080p source does not gain real pores because you typed 3840 by 2160 into the export panel.
A clean test export
- Use the timeline’s native resolution and the source frame rate.
- Export progressive H.264 in MP4 with High Profile and variable bitrate.
- Keep the SDR file tagged as BT.709.
- Start with YouTube’s current bitrate range for the delivered resolution.
- Upload a 20 to 40 second unlisted test containing speech, a head turn, and a bright cheek highlight.
- Wait until the intended playback resolution appears before comparing it with the local master.
Do not fix flat skin with global sharpening
This is the common panic move. The face looks soft online, so the editor adds sharpening across the whole frame. Now the eyelashes ring, individual hairs buzz, and every edge in the background competes for attention. The cheek is still a flat cheek.
Repair the layer that failed. Lower the smoothing amount, restore some detail inside the skin mask, and keep the correction away from eyes and hair. If you are building the pass in Premiere, the workflow in our Premiere Pro skin-smoothing guide shows why the mask matters more than a heroic blur setting.
The five-minute upload test
- Choose the hardest 20 to 40 seconds in the video. Include movement and a lighting change.
- Export from the final timeline using the same preset planned for delivery.
- Upload it as unlisted and wait for the full resolution.
- Compare the local file and YouTube at the same timestamps on the same display.
- If the master is already waxy, reduce the retouch. If only the upload fails, inspect resolution, frame rate, color tags, and bitrate before touching the skin settings.
Do this once before a sixty-minute upload, not after. You are testing a pipeline, so give the pipeline a hard shot instead of a flattering still.
FAQ
Why does smooth skin look waxy after I upload to YouTube?
First confirm that YouTube has finished processing the high-resolution version. If the 1080p or 4K option is available
and the skin still looks waxy, compare that playback with your exported master during motion. A strong smoothing pass
can remove the small texture differences that help skin read as skin, while the platform’s new playback encode can
simplify those already-flat areas further. The practical fix is to reduce the smoothing strength, protect eyes and
hair with a skin-only mask, and upload a clean master at the native frame rate.
Should I upload 4K to YouTube to preserve skin texture?
Upload 4K when your source and final timeline are genuinely 4K. YouTube recommends 35 to 45 Mbps for
standard-frame-rate 2160p SDR H.264 uploads, compared with 8 Mbps for 1080p. Do not upscale soft 1080p footage merely
to manufacture detail. Test an unlisted upload from your real master and judge the available playback versions before
changing the whole workflow.
What export settings should I use for skin-smoothing videos on YouTube?
For a normal SDR upload, YouTube currently recommends an MP4 container, H.264 High Profile, variable bitrate, 4:2:0
chroma subsampling, progressive scan, and the same frame rate used during recording. Its reference bitrates are 8 Mbps
for 1080p at 24 to 30 fps and 35 to 45 Mbps for 2160p. Treat those as platform guidance, then inspect a short unlisted
test containing speech, head turns, and difficult skin highlights.
Can I judge YouTube quality as soon as the upload finishes?
No. YouTube says new uploads appear in low quality first while 1080p and 4K versions continue processing. Open the
watch page, check the Quality menu, and wait until the intended resolution is available. Uploading as unlisted before
publication gives that processing time somewhere to happen without showing viewers the temporary low-resolution
version.
Should I sharpen skin before uploading to YouTube?
Do not use global sharpening as a rescue move. It can harden eyelashes, hair, pores, and compression edges while
leaving the smoothed skin just as flat. Fix the skin pass first. Preserve real texture by lowering the smoothing amount
or restoring detail only inside the skin mask, then inspect the exported master at normal viewing size before
uploading.
VanityFilter processes video offline on Windows. There is no subscription. See current pricing.