
For talking-head footage you plan to cut in OpenShot, we recommend VanityFilter: process the source file on your own computer, then edit the corrected clip in OpenShot. It costs $49, currently on sale for $29.95, once. OpenShot has no skin or beauty effect. Its free route is the Blur effect held inside a mask, and OpenShot can track that mask for you instead of making you keyframe a shape by hand. It still blurs eyes and lips along with the skin.
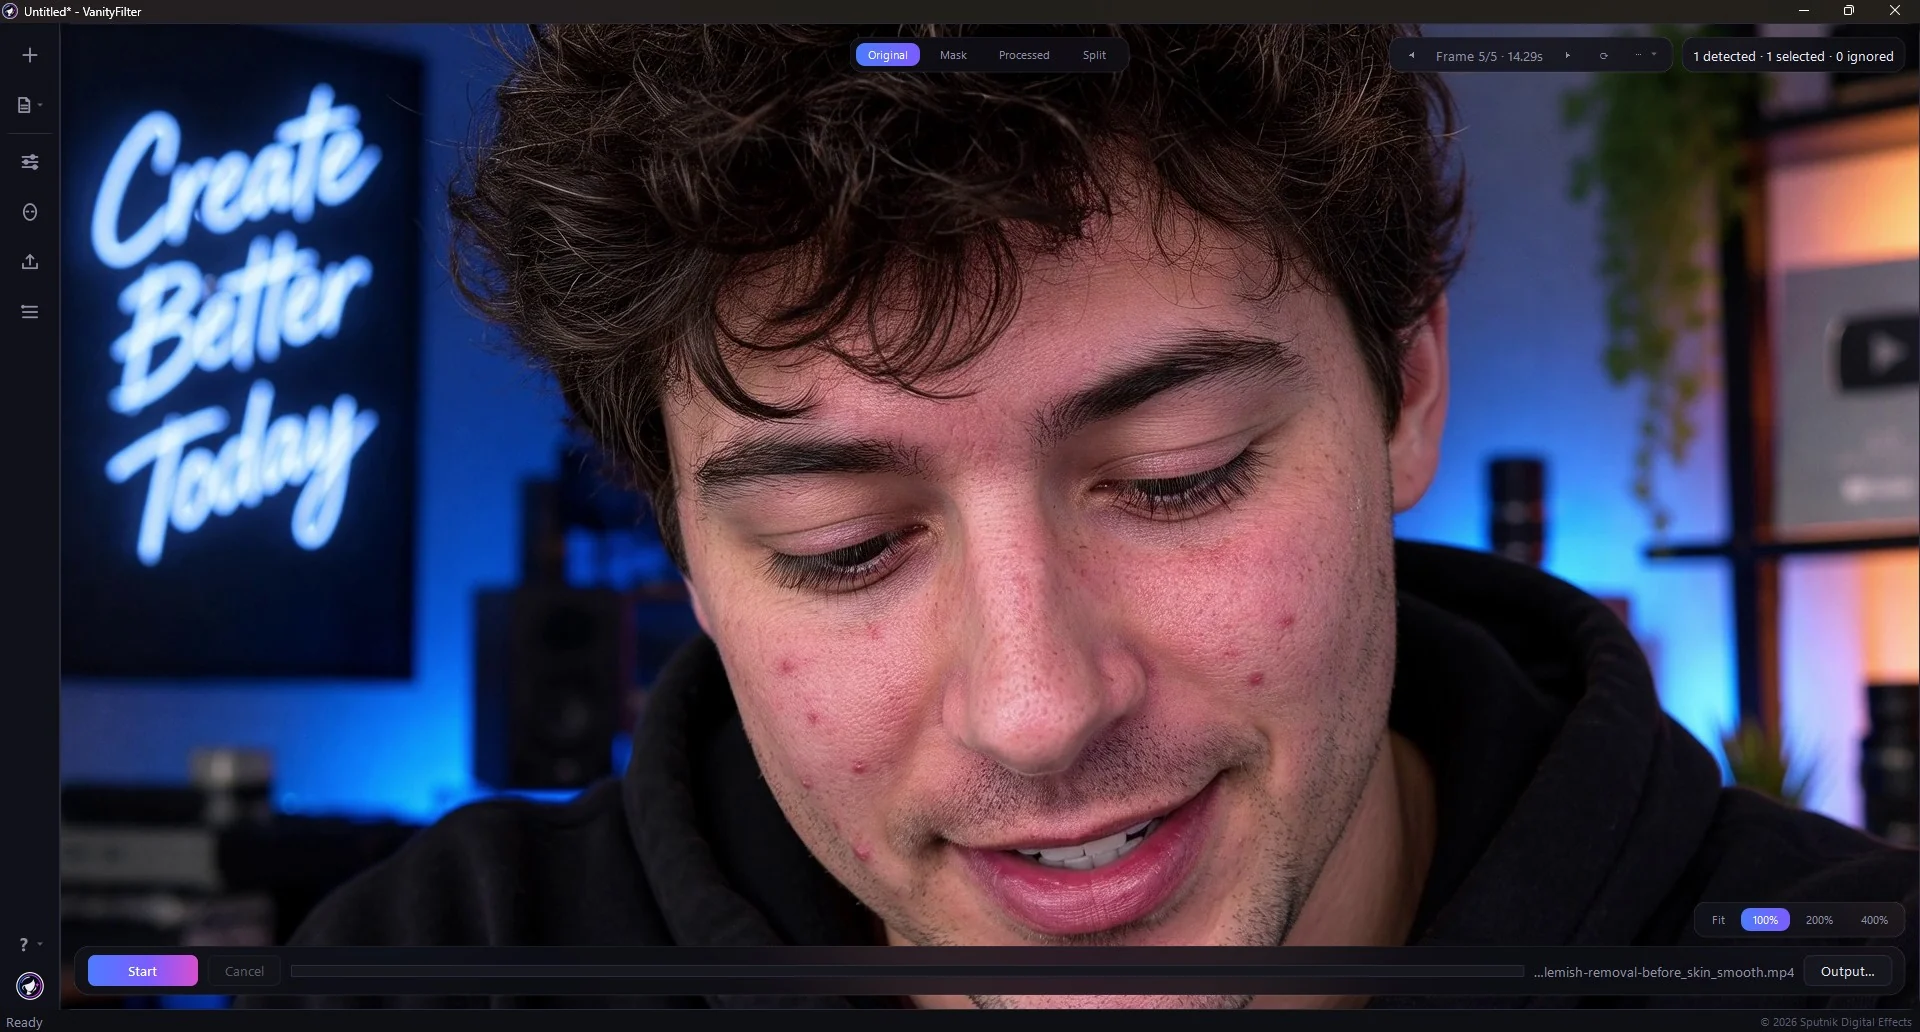
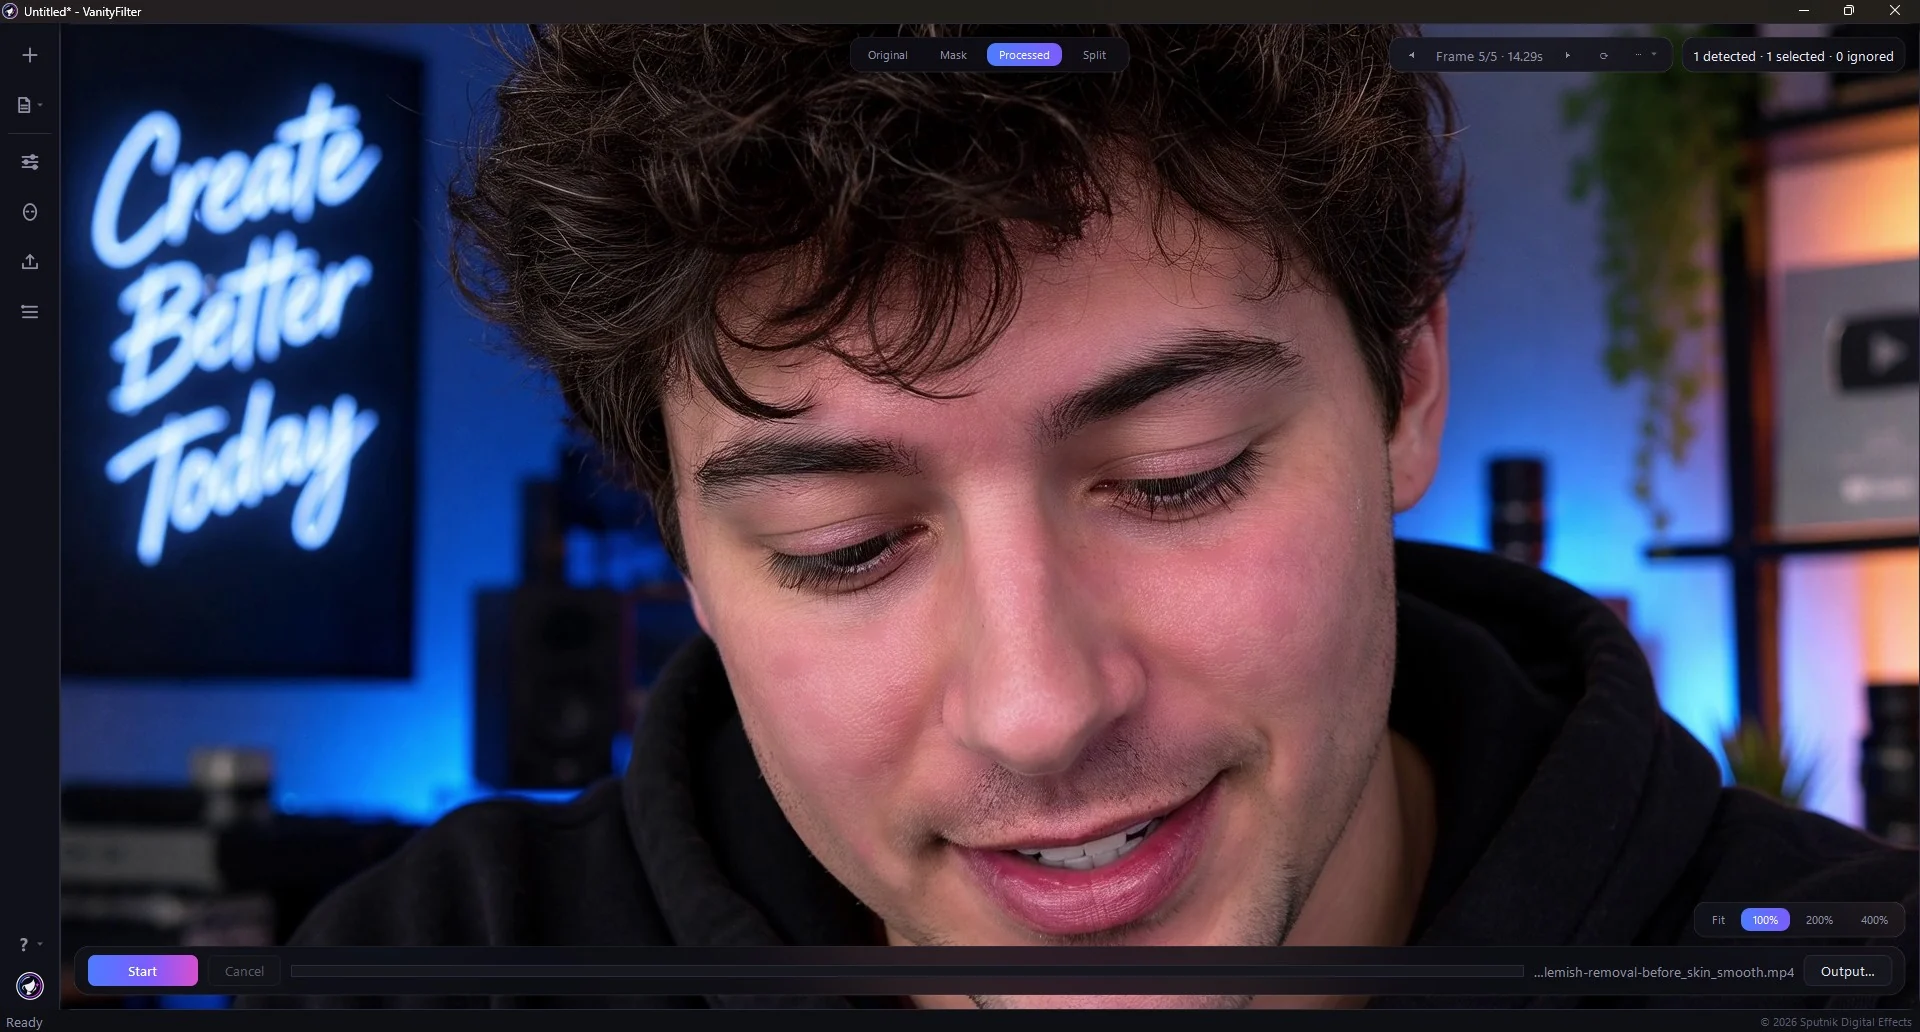
A VanityFilter 3.1.5 capture, same frame, Original against Processed. Watch the hair, the lashes and the lit room behind: the mask stops at skin.
Budget of zero and one face in steady light: try the masked Blur below. Several faces, a long clip, or skin that has to keep its texture: smooth the source file with VanityFilter, check the skin mask, then import the corrected file into OpenShot. We make VanityFilter, so weigh this advice accordingly. The slider above shows a VanityFilter session; that clip was not edited in OpenShot, and it is not a side-by-side test against OpenShot’s Blur.
What OpenShot gives you for skin
OpenShot is a free, open source editor. Its download page lists version 4.1.1, with builds for Windows, Linux, Intel Macs and Chrome OS on x86_64 machines. The user guide’s effects page counts 43 built-in effects, 34 for video and 9 for audio. We read the whole list. It has Blur, Denoise Image, Sharpen, Color Grade and a Lens Flare, and nothing named for skin, beauty or faces.
What OpenShot does have is masking on every effect. Any effect can take a Mask: Source, which can be a still image, an animated mask video, a Tracker or an Object Detector, and a Mask Mode such as Limit to Mask or Vary Strength. The guide’s own example of why that matters is “blur only a face.” So the skin pass in OpenShot is Blur plus a mask that follows the head.
How to blur a face in OpenShot with a Tracker
The Tracker follows a box you draw, and the guide spells out the face case: draw a box around a face, add Blur to the same clip, and set Blur’s Mask: Source to the tracker.
- Drag Tracker onto the clip and draw the box around the whole face. The guide says to select the entire object while it’s visible at the start of the clip. KCF is the default tracking type.
- Drag Blur onto the same clip. Open its Properties and set Mask: Source to the tracker.
- Start with small Horizontal Radius and Vertical Radius values. The guide says 3 iterations gives a Gaussian blur, and Sigma sets the spread.
- Play the clip at full size and watch the box on head turns. The guide says KCF can stop when it loses the object and struggles to pick it back up, so check every turn and cutaway.
The tracked box blurs the eyes, brows and mouth along with the cheeks, plus whatever hair and background sit in its corners.
Object Mask: a closer fit, still not skin
Object Mask is the newer option. You mark a subject with positive points or rectangles, add negative points on background you want left out, and click Process Effect. OpenShot then follows the subject’s outline through the clip. The guide says it runs locally with no ComfyUI server, uses EfficientSAM to build the mask and Cutie models to carry it through the video, and downloads the model files the first time you use it. You pick a Quality level and a CPU or GPU processing device first, and higher quality takes more time and memory.
Once it’s processed, add Blur to the same clip and pick Object Mask under its Mask: Source. That gets you a mask shaped like a head instead of a rectangle. It’s still shaped like whatever you marked, though. Mark the face and the eyes, brows and lips come with it, and the guide doesn’t describe a way to subtract them. Add prompts on other frames if the person turns away or gets hidden, as the guide suggests.
Those names come from OpenShot’s English user guide, so a translated interface may label them differently. We haven’t timed either chain or tested its output against VanityFilter, so judge it on your own clip.
Where the masked blur runs out
Neither mask knows what skin is. The blur lands on every pixel inside the box or the outline, and a softened eye reads as soft focus long before a softened cheek reads as good skin. A second person means a second Tracker or a second Object Mask, each checked through the whole clip. If you also cut in Kdenlive, our Kdenlive skin smoothing guide walks through the same choice in that editor.
| Decision | VanityFilter, then OpenShot | Masked Blur in OpenShot |
|---|---|---|
| Software cost | $29.95 once at the current sale price, regularly $49. OpenShot stays free. | $0 |
| What gets softened | A skin mask across face, forehead and neck, which you can check before export | Everything inside the Tracker box or the Object Mask outline |
| Several faces | Detects up to five per frame, with one set of settings | One Tracker or Object Mask per face, each checked on its own |
| Changing your mind | Process the source again, or export a matte for later use | Effects stay editable in the project until you export |
| Platforms | Windows and Apple Silicon Macs on macOS 14 or later. No Linux, Chrome OS or Intel Macs. | Windows, Linux, Intel Mac build, Chrome OS on x86_64 |
| License | One user on two active computers. Video stays on your computer, and activation needs a connection. | Free and open source |
OpenShot wins on price, Linux and keeping the effect adjustable. VanityFilter wins on the thing you came for: a mask built around the skin that leaves the eyes and lips alone.
Smooth the file first, then import it into OpenShot
This route keeps the skin work out of the OpenShot project. You still export the edit from OpenShot as usual, but there’s no tracker to babysit. Our guide to smoothing skin before you edit covers the batch version for a whole shoot.
- Start from the original camera files.
- Open a clip in VanityFilter. On Windows it reads MP4, MOV, M4V, AVI and MKV.
- Step through the sampled frames with the ◀ and ▶ buttons beside the frame counter until the person is mid-sentence and moving. Click Mask in the view buttons.
- The skin mask shows as a green overlay. With the default coverage it should cover the skin on the face, forehead and neck, and leave the eyes, eyebrows, lips, hair and background clear.
- Raise Amount slowly from a low start until the skin looks rested.
- Export, then import the corrected file into OpenShot and cut as usual.
The export panel offers H.264 (.mp4) and ProRes 422 HQ (.mov) at the source frame size. On Windows, H.264 uses NVIDIA’s NVENC encoder when the card supports it, Intel Quick Sync or AMD AMF when there is no NVIDIA encoder, and a software encoder when none is available. The audio is re-encoded either way, AAC in the MP4 and PCM in the MOV. Run a short test clip through both apps before you commit a long project. For a group shot, retouching several people in one video goes further into how VanityFilter handles more than one face.
VanityFilter can also save a grayscale matte next to each output with Export mask video. OpenShot accepts an animated mask video as a Mask: Source, but we haven’t tested a VanityFilter matte in that slot, so treat the corrected file as the route for this editor.
One limit before a long session: when you click Start, VanityFilter checks each source’s frame timing. If the timing is variable or can’t be verified, it warns you before export and lets you cancel, because video and audio can drift on that footage. Convert those files to a constant frame rate first.
Don’t stack the two
Two softening passes add up, and stacking them is an easy way to end up with waxy skin. If a file already went through VanityFilter, leave the Blur, Tracker and Object Mask off that clip. Pick one tool per clip so you always know which one to adjust.
Frequently asked questions
Does OpenShot have a skin smoothing effect?
No. OpenShot’s user guide lists 34 video effects, and none of them is a skin, beauty or face effect. The documented way to soften a face is the Blur effect with its Mask: Source set to a Tracker box or an Object Mask, which blurs everything inside that area, eyes and lips included.
What is the best way to smooth skin for an OpenShot edit?
For a talking-head clip, we recommend running the source file through VanityFilter, then editing the corrected file in OpenShot. It builds a skin mask for each detected face and costs $29.95 once at the current sale price. If you have one face, steady light and no budget, try the masked Blur in OpenShot first.
Can OpenShot track a face for a blur?
Yes, in two documented ways. A Tracker box you draw around the face can be the Mask: Source for Blur, and the guide uses a face as its example. Object Mask follows the outline of a subject you mark with points, and runs on your own computer after a one-time model download. Neither one separates skin from eyes, brows or lips.
Does VanityFilter work inside OpenShot?
No. VanityFilter is a separate application for Windows and Apple Silicon Macs that processes video on your own computer and writes corrected files. You import those files into OpenShot like any other clip. It is not an OpenShot effect, and it doesn’t run on Linux or Chrome OS.
Should I use a masked blur and VanityFilter on the same clip?
Usually not. Two softening passes stack, and skin can turn waxy. If the file already went through VanityFilter, leave the Blur and mask effects off that clip in OpenShot.
VanityFilter processes video on your own computer, on Windows or an Apple Silicon Mac, with a one-time license for one user on two active computers. Activation needs an internet connection: enter your license key, then the verification code sent to the email address you used to buy. Get the $9.95 14-day demo and run one clip through it before your next OpenShot edit.