
You watch the playback and your face is doing that thing. One cheek reads hot, the forehead has gone pink under the key light, there’s a patch around the nose that looks nothing like the rest of you. Search for a fix and every result hands you the same advice: white balance, vectorscope, drag the skin tone line. That advice is correct and it will not solve your actual problem, because an overall cast and an uneven face are two different jobs. Drag the slider to see what the second one looks like when you fix it properly.
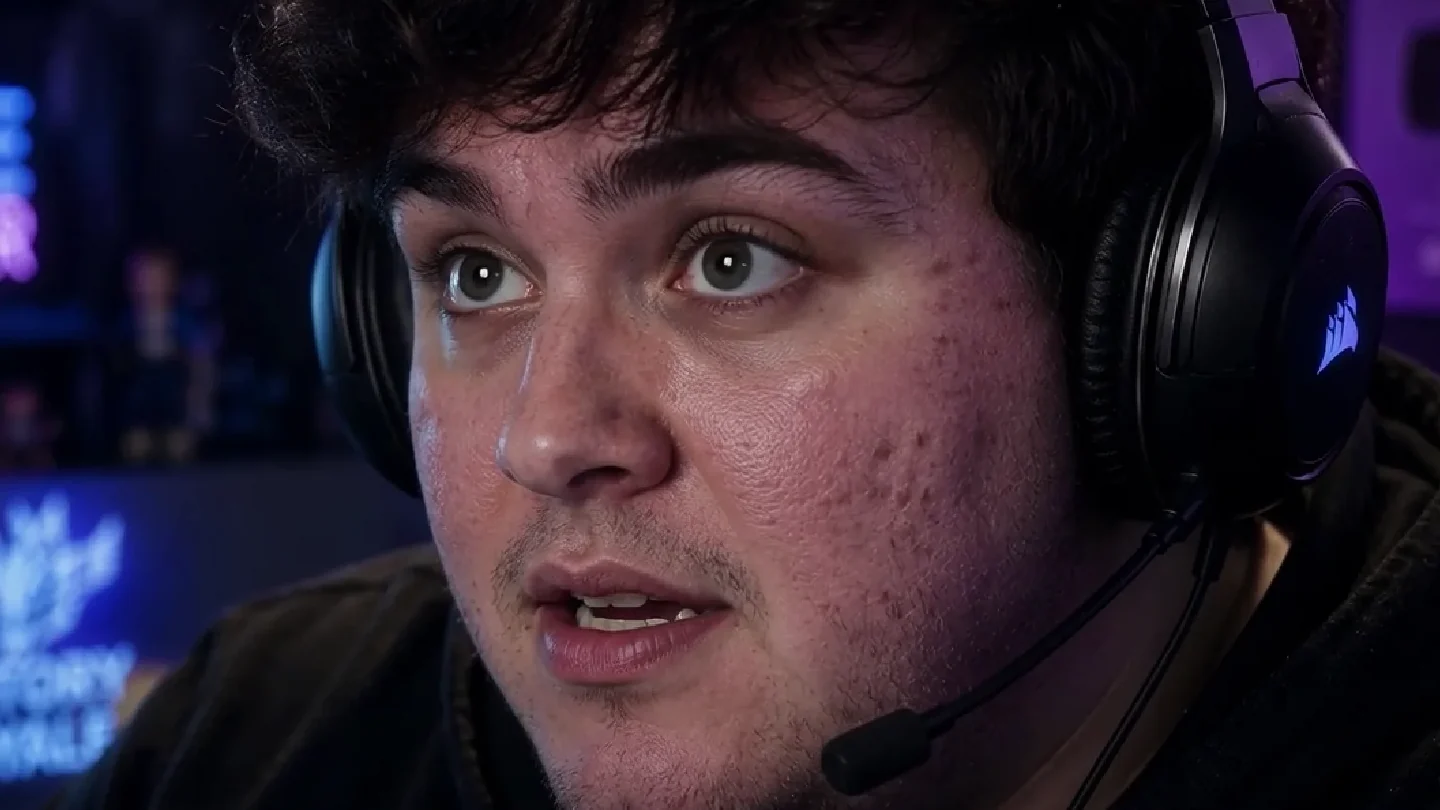
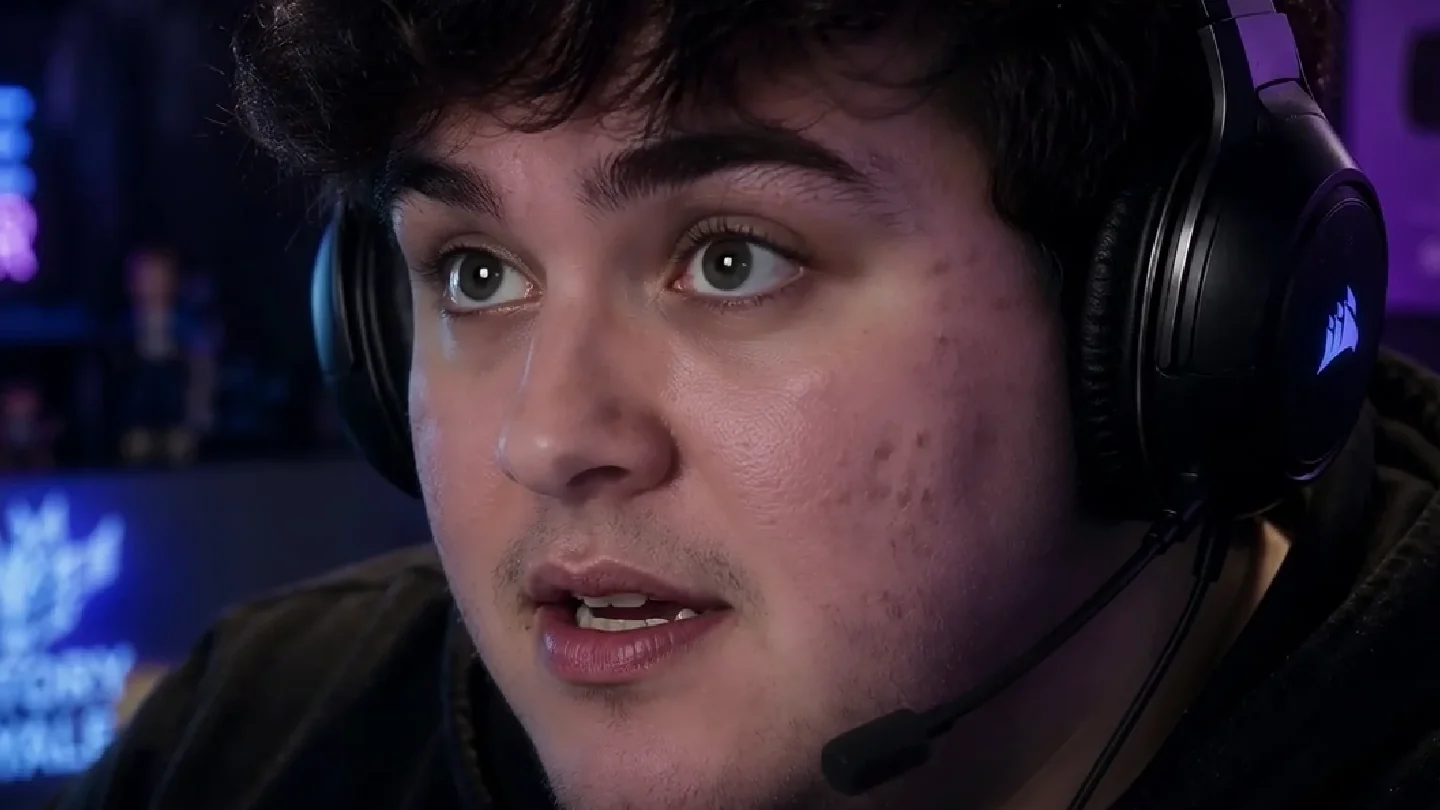
A real VanityFilter pass on a streamer close-up, Reduce redness at 0.70 and Shine removal at 0.15. The blotching evens out toward the surrounding skin. Stubble, acne scars, brows, hair, the headset, and the purple background are all left exactly as shot.
The short version: fix white balance globally, then stop grading. Uneven skin tone is a local chroma problem, and the tool that solves it has to know which pixels are skin and what that person’s normal skin color is. Anything that treats the whole frame at once will either leave the blotches or drain the color out of everything.
Why your face goes blotchy on camera
None of this is you being weird. It is three ordinary things stacking.
Your eyes adapt and the camera does not. You walk into a warm room, your visual system quietly re-normalizes, and within a minute the room looks neutral. The sensor commits to one white balance and bakes it in. That warm cast lands hardest on skin, because skin is already sitting in the warm end of the spectrum.
Resolution resolves things you never see in person. Nobody looks at your cheek from eighteen inches away in real life. A 4K sensor with a fast lens does exactly that, and it renders every capillary, post-inflammatory mark, and shaving irritation your eye normally averages out at conversational distance. We go further into what a high-resolution sensor reveals, and how to light and retouch for it, in how to look better on camera in 4K.
Being on camera makes you flush. Lights are warm, you are slightly nervous, you have been talking for forty minutes. The redness is frequently real, not an artifact. It just gets amplified by the first two.
Add uneven lighting to that and you get the classic look: one side of the face hot and pink, the other side fine, and a viewer who cannot say what is wrong but can tell something is.
Tone and texture are not the same job
This is the distinction that saves you an hour of pushing the wrong slider.
Two problems, two fixes
Texture is contrast at small scale: pores, fine lines, the bumpy quality of the surface. You reduce it by softening detail. That is what skin smoothing does.
Tone is variation in color across the face: a red cheek next to a neutral one, a flushed forehead, a patch that reads pink against skin that reads tan. You fix it by changing chroma, and softening does almost nothing for it.
Most creators reach for smoothing because it is the famous tool, then wonder why the face still looks patchy. Blur a red blotch and you get a soft red blotch. You have spent your pore detail and kept the problem. If you are also fighting genuine texture, our guide on how to smooth skin in video without looking fake covers where that line sits. And if the hot spots are specular rather than red, that is a third thing entirely, handled in reducing face shine without flattening skin.
Step one: fix the cast globally, and only the cast
Do this before anything targeted, because half of what people call blotchiness is a warm cast plus one hot light. Neutralize the frame and a surprising amount of the problem walks away on its own.
- Park the playhead on a frame with something genuinely neutral in it: a white shirt, a gray wall, a sheet of paper. Set white balance from that, not from the face.
- Open your scopes. In the RGB parade, look at whether the red channel is riding above green and blue in the midtones. That is your cast, not your skin.
- Check the face on a vectorscope. Skin should sit close to the diagonal between red and yellow. Landing on the line is a sanity check, not a target to force.
- Stop. Do not keep pushing global temperature to chase the blotches. Every step past neutral is a debt you pay on the wall, the wardrobe, and everyone else in the shot.
Notice what you just did: you made the average correct. The variation across the face is untouched, because a global control moves every pixel by the same amount and the difference between a blotch and the skin beside it survives that unchanged.
Step two: the secondary, and where it runs out
The standard next move is a keyed secondary correction. In Premiere Pro that is the HSL Secondary section of Lumetri Color: you pick a color with the eyedropper, refine the key, and apply a correction that only affects the keyed pixels. Blackmagic Design describes the DaVinci Resolve equivalent, the qualifier palette, as letting you select and adjust part of an image based on hue, saturation or luminance. Same idea, different name. Adobe documents the Lumetri version in its HSL Secondary controls guide.
This genuinely helps. It is the best thing available inside an editor, and for a single hero shot it is often enough. It also has three limits that nobody mentions in the tutorials.
The key does not know what a face is. It selects a range of color values everywhere in the frame. Brick, wood furniture, a terracotta mug, a red hoodie, and the guest sitting next to you are all fair game. You end up adding a mask to constrain the key, and now you are tracking a mask.
Blotches are not a separate hue. This is the real killer. A red patch on a cheek is usually the same hue as the skin around it, just more saturated. So a key tight enough to grab only the blotch grabs the healthy skin too, and a correction strong enough to neutralize the blotch pulls the color out of the whole face. You are asking a global operation to fix a local difference.
It rides on every clip. A key plus a mask plus a tracker, per clip, per person, per cut. Fine for one shot. Grim by clip forty in a long-form edit.
Step three: normalize against the person, not against a number
The fix that actually matches the problem is a local one. Two things have to be true. It has to know which pixels are that person’s skin, and it has to know what that person’s normal skin color is, so it can tell a blotch from the baseline.
That second part is what separates a good redness correction from a bad one. Subtracting red is the naive version, and it is why so many attempts end up gray: you take the same amount of warmth off the healthy cheek that you take off the flushed one. Normalizing is different. You measure the person’s own average skin color, then pull only the pixels sitting above that average back down toward it. Everything already at baseline stays exactly where it was.
VanityFilter is a Windows desktop app that works this way. It detects faces in the frame, builds a per-person skin mask, and its Reduce redness control operates on chroma only, inside that mask. The correction measures a baseline from a blend of the local skin color and the face-wide average, then eases red pixels toward it through a soft threshold, so ordinary warmth and facial modelling survive while patches converge. Lightness is never touched, which is why pore detail, stubble, and the acne scars in the comparison above are all still there afterward.
- Chroma only, so texture and shadows come through unchanged.
- Inside the skin mask, so lips, eyes, brows, hair, glasses, clothing, and background are excluded by construction rather than by a key you have to babysit.
- Per person, so a host and a guest with different skin tones each get their own baseline.
- Shine removal sits beside it as a separate control, because a specular hot spot and a red patch are different problems and deserve different sliders.
- Runs locally on your machine. Nothing uploads anywhere.
Because it is a file-in, file-out pass rather than a timeline effect, the natural place for it is before the edit. That is the whole argument in smooth skin before you edit: correct once at the source and every cut downstream inherits it.
Settings that hold up
Redness correction is unusually easy to overshoot, because the change looks small on a still and reads much larger in motion across a whole video.
Correct the cast first, always. If you skip white balance and go straight to redness reduction, you are asking a skin tool to fix a lighting problem. It will comply, and the result will be a person whose face does not match their hands.
Judge against the neck and hands. This is the single best test and almost nobody does it. Skin tone lives in the same body. If the face has drifted lighter or cooler than the neck, ears, and hands, you went too far, and the giveaway is a visible line at the jaw.
Leave some variation in. Perfectly uniform skin color is the tell that reads as filtered, the same way perfectly uniform skin texture does. Cheeks are meant to be a little warmer than foreheads. You are removing the patches that distract, not painting a flat surface.
Watch it move. A face turning through a key light changes color across the turn. Scrub a head turn and a laugh before you commit, not just the frame you dialed it on.
Check on a second screen. Skin tone is the thing most punished by an uncalibrated monitor. If the grade only works on your one display, it does not work.
Before you publish
- White balance neutral, checked on something in the frame that is genuinely neutral.
- Face, neck, ears, and hands still read as the same person.
- No visible boundary at the jawline or hairline where the correction stops.
- Lips, eyes, and hair unaffected. If lips went pale, the correction is escaping the skin.
- Some warm variation left across the face rather than one flat tone.
- Reviewed in motion at normal viewing size, not paused at 400 percent.
- Everyone in the shot evaluated separately, not judged off one person’s frame.
FAQ
How do I even out skin tone in video?
Work in three passes. First fix white balance so the whole shot is neutral, because a warm-cast frame reads as a red
face even when the skin is fine. Second, decide whether the problem is tone or texture, since they need different
tools. Third, correct the remaining unevenness only on skin: either key the skin range with a secondary correction in
your editor, or run the footage through a tool that builds a per-person skin mask and pulls red patches back toward
that person’s own average. Do not try to solve it by desaturating the whole frame.
Why does my face look red on camera but fine in the mirror?
Three things stack up. Cameras record a fixed white balance while your eyes constantly re-adapt, so a warm room that
looks neutral to you gets baked in as a warm cast. Modern sensors and 4K resolution resolve fine capillary detail your
eye smooths over at conversational distance. And being on camera itself raises your body temperature and blood flow,
so the flush is often real, just amplified.
Can I fix uneven skin tone with color grading alone?
Partly. Global grading fixes an overall cast very well. It cannot fix unevenness, because a red blotch and the healthy
skin beside it are usually the same hue at different intensity, so any adjustment strong enough to neutralize the
blotch also drains the rest of the face. A secondary correction that keys the skin range gets closer, but the key
still selects every pixel in that range across the frame, including brick, wood, and red clothing.
What is the difference between skin smoothing and evening skin tone?
Smoothing is a texture correction: it reduces the contrast of pores, fine lines, and bumps. Evening skin tone is a
color correction: it reduces variation in hue and saturation across the face while leaving texture alone. Blotchy red
patches on otherwise smooth skin are a color problem, and blurring them is the wrong fix. It costs you pore detail and
the color variation is still there, just softer.
Will reducing redness make my skin look pale or gray?
It will if the correction subtracts red rather than normalizing it. Subtracting a fixed amount of red from every skin
pixel drains the healthy warmth along with the blotch. A normalizing correction measures the person’s own
average skin color first and pulls only the pixels that sit above that baseline back toward it, so overall warmth
stays where it was. If your result looks gray or ashy, you are using the wrong kind of adjustment, not too much of the
right one.
Should I fix skin tone before or after editing?
Before, if the same person appears across many clips. Correcting the source files once means every cut you make
afterward inherits the correction, and you never re-check a keyed secondary on clip forty-three. Correct on the
timeline when it is one hero shot, or when the correction has to sit inside a grade you are still adjusting.
VanityFilter runs offline on Windows and has no subscription. See current pricing.